如何使用axios请求后台和配置代理
Axios 是一个强大的 JavaScript 库,用于发出 HTTP 请求。只需几行代码,开发人员就可以
GET向网页发送请求并以各种格式(包括 JSON 和 CSV)检索其 HTML 内容。
但是,许多网站会阻止机器人流量,这可能会阻碍您的Axios 网络抓取工具。幸运的是,将 Axios 与代理相结合来路由您的请求可以帮助规避网站检测。
本教程将使用真实示例向您展示如何做到这一点。我们将探索免费和付费代理以及一些避免被阻止的便捷方法。
准备工作
Axios 是一个 JavaScript 库,因此我们将使用 NodeJS 进行网络抓取。
首先,请确保您已安装NodeJS和 npm。然后,为您的 JavaScript 文件创建一个新文件夹,并使用以下命令初始化一个新项目:
mkdir scrapeaxios
cd scrapeaxios
npm init -y
它创建一个package.json具有默认值的文件。接下来,安装 Axios 及其依赖项。
npm i axios
如何使用 Axios 代理
让我们看一个使用HTTPBin作为目标页面和来自Free Proxy List 的IP在 Axios 中设置代理的示例。
IP: '149.129.239.170',
port: 8080
导入 Axios 并添加代理详细信息。
const axios = require('axios');


axios.get('https://httpbin.org/ip',
    {
        proxy: {
            protocol: 'http',
            host: '149.129.239.170',
            port: 8080,
        },
    }
)
    .then(res => {
        console.log(res.data)
    }).catch(err => console.error(err))
由于httpbin端点返回请求客户端的公共 IP 地址,因此您的代码应返回代理的 IP 地址。
运行代码,您的结果应如下所示:
{ origin: '149.129.239.170' }
然后,拥有 JSON 格式的响应将派上用场。您可以通过多种方式进行处理,因此这里有几个选项:
- 使用方法解析响应数据
JSON.parse。如果成功,您将收到 JSON 响应。否则,在大多数情况下它会生成一个字符串。
const axios = require('axios');


axios.get('https://httpbin.org/ip',
    {
        proxy: {
            protocol: 'http',
            host: '149.129.239.170',
            port: 8080,
        },
    }
)
    .then(res => {
        let data;
        try {
          data = JSON.parse(res.data);
        } catch (err) {
          // if the response is not JSON, use it as is
          data = res.data;
        }
        console.log(data);
      }).catch(err => console.error(err))
- 使用选项自动解析数据
responseType。
const axios = require('axios');


axios.get('https://httpbin.org/ip',
    {
        proxy: {
            protocol: 'http',
            host: '149.129.239.170',
            port: 8080,
        },

        responseType: 'json',
    }
)
    .then(res => {
        console.log(res.data);
      }).catch(err => console.error(err))
这两种方法的代码产生的结果与上面的示例相同。但是,没有 try-catch 块的方法 #1 会产生语法错误。那是因为 HTTPBin 返回的响应已经是 JSON 格式了。
使用 Axios 进行代理身份验证:用户名和密码
付费代理通常需要使用用户名和密码进行身份验证,因此 Axios 提供了一个auth属性,允许您将它们传入以使用您的代理服务器。
auth: {
    username: ''
    password: ''
}
这是将属性添加到脚本的方式:
const axios = require('axios');


axios.get('https://httpbin.org/ip',
    {
        proxy: {
            protocol: 'http',
            host: 'proxy_host',
            port: portNumber,
            auth: {
                username: '',
                password: ''

            },
        },

    }
)
    .then(res => {
        console.log(res.data);
      }).catch(err => console.error(err))
Axios 代理的环境变量
环境变量是软件程序可以访问以配置其行为或获取环境数据的动态值。使用它们,Axios 允许您指定代理设置、身份验证凭据和其他配置选项等信息。
这样,您就可以自动访问代理详细信息,而无需在 Axios 请求中传递它们。为此,请在您的环境变量中定义代理设置和凭据。然后,发送 Axios 请求。
让我们看一个例子。
在您的终端中,使用以下语法和export命令使用代理服务器详细信息设置环境变量。对于 Windows,请set改用。
export HTTP_PROXY=http://<Proxy_host>:<port>
export HTTPS_PROXY=https://<Proxy_host>:<port>
接下来,使用我们的初始代理详细信息设置环境变量,如下所示:
export HTTP_PROXY=http://149.129.239.170:8080
因为现在我们不再需要在我们的 Axios 请求中包含我们的代理,我们的代码应该如下所示:
const axios = require('axios');


axios.get('https://httpbin.org/ip')

.then(res => {
        console.log(res.data);
      }).catch(err => console.error(err))
这是结果:
{ origin: '149.129.239.170' }
使用 Axios 的旋转代理
网站可以检测并阻止来自特定 IP 地址的请求,因此您需要在多个代理之间分配抓取流量以避免这种情况。如果你轮换 IP,你的抓取工具会明显更有效。
创建代理旋转器的不同方法包括以下选项:
- 在指定数量的请求后手动切换代理。
- 使用一系列代理自动化该过程。
- 使用代理池解决方案。
使用免费解决方案轮换 IP
使用免费解决方案轮换代理涉及使用多个代理池并随机化每个请求。您可以选择免费提供程序,例如Free Proxy List,它提供了一个代理列表,您可以将其下载到 CSV 文件或作为静态数组的硬代码中。
让我们创建我们的代理旋转器。
首先定义代理列表数组。
const axios = require('axios');

const proxyList = [
  { ip: '198.59.191.234', port: '8080' },
  { ip: '200.105.215.22', port: '33630' },
  { ip: '125.17.80.229', port: '8080' },
]; // Replace with your own list of proxies
然后,创建一个通过代理列表轮换的函数。对于每个请求,它将转移到下一个代理,同时将当前代理返回到队列的末尾。
// Function to rotate through the list of proxies
const rotateProxy = () => {
  const proxy = proxyList.shift(); // Get the next available proxy
  proxyList.push(proxy); // Add the current proxy back to the end of the list
  return {
    protocol: "http",
    host: proxy.ip,
    port: proxy.port,
  };
}
使用该rotateProxy()函数作为代理选项发出您的 Axios 请求。
axios.get('https://httpbin.org/ip',
        {
            proxy: rotateProxy(),

        }
    )
        .then(res => {
            console.log(res.data);
        }).catch(err => console.error(err))
当我们将所有东西放在一起并使用 aFOR LOOP进行多个请求时,我们的完整代码将如下所示:
const axios = require('axios');

const proxyList = [
  { ip: '198.59.191.234', port: '8080' },
  { ip: '200.105.215.22', port: '33630' },
  { ip: '125.17.80.229', port: '8080' },
]; // Replace with your own list of proxies

// Function to rotate through the list of proxies
const rotateProxy = () => {
  const proxy = proxyList.shift(); // Get the next available proxy
  proxyList.push(proxy); // Add the current proxy back to the end of the list
  return {
    protocol: "http",
    host: proxy.ip,
    port: proxy.port,
  };
}


for (let i = 0; i < 3; i++) {
    axios.get('https://httpbin.org/ip',
        {
            proxy: rotateProxy(),

        }
    )
        .then(res => {
            console.log(res.data);
        }).catch(err => console.error(err))
}
结果如下:
{ origin: '198.59.191.249' }
{ origin: '200.105.215.22' }
{ origin: '125.17.80.229' }
您已经使用 Axios 创建了您的第一个代理旋转器。
但是,如前所述,免费代理不可靠且经常失败。我们在此示例中仅使用它们来向您展示基础知识。如果我们将 HTTPbin 替换为OpenSea,我们将收到类似于下面的错误消息。
AxiosError: Request failed with status code 403
高级代理以避免被阻止
过去,高级代理的实施成本很高,尤其是对于大规模抓取而言。然而,随着一些商家的解决方案出现,情况发生了变化。您可以从每月 几十美元起步,配备地理位置功能,并且仅对成功的请求收费。
现在,让我们看看如何使用 ZenRows来进行示范。
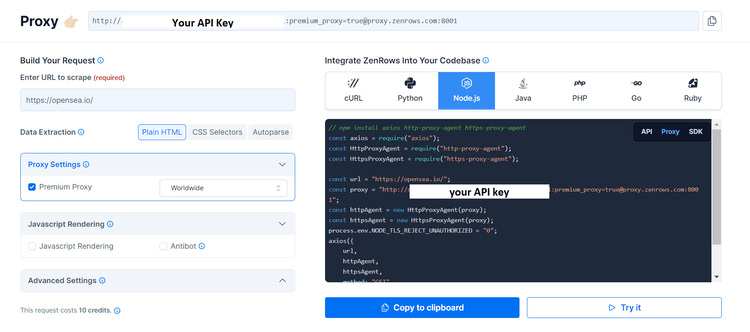
首先,注册以获取您的 API 密钥。登录后,您会在页面顶部找到它。
接下来,导入 Axios 并使用之前的目标 URL ( OpenSea ) 和您的 ZenRows 代理凭据创建您的请求配置。
// Import the Axios library
const axios = require('axios');

// Make a GET request to the target URL
// with the following options:
axios.get('https://opensea.io/', {
    proxy: {
        protocol: 'http',
        // The hostname of ZenRows proxy server
        host: 'proxy.zenrows.com',
        // The port number
        port: 8001,
        // authentication credentials for the proxy server
        auth: {
            // Use your API_Key as your username
            username: 'API_key',
            // Set the premium proxy parameter as your password
            password: 'premium-proxy=true'
        },
    },
})
    .then(res => {
        // Log the response data to the console
        console.log(res.data);
    })
    .catch(err => console.error(err)); // Log any errors to the console
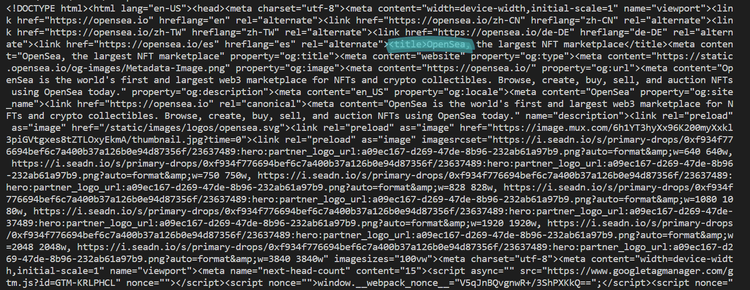
结果应如下所示:


结论
使用带有代理的 Axios 来路由您的请求将被证明在规避网站阻止方面具有无可估量的价值。


防火墙-768x510.jpg)


