如何为Node-Fetch配置代理服务器?
Node-Fetch 是一个广泛采用的 HTTP 库,它提供了一种发出异步
fetch请求的简单方法。与现代 Web 浏览器中提供的默认 Fetch API 不同,Node-Fetch 可以在 NodeJS 应用程序和脚本的后端使用,这使其成为Web 抓取的理想选择。
然而,与其他 HTTP 库一样,您的网络抓取工具很快就会被阻止,因此您需要代理来检索必要的数据。Node-Fetch 不支持实现它们,但有一个解决方法。
在本文中,您将了解如何使用 Node-Fetch 代理来提高匿名性并模拟人类行为。
在我们深入研究之前,您需要按照本教程进行操作。
先决条件
首先,您至少需要安装 Node.js 版本 12.20.0。这是当前 Node-Fetch 稳定版本的最低要求。
然后,在项目目录中使用以下命令安装 Node-Fetch:
npm i node-fetch
有时,您在项目中使用 Node-fetch 库时可能会遇到错误消息:Error: cannot find module 'node-fetch'.。当模块解析找不到您安装的 Node-Fetch 模块时,通常会发生这种情况。要解决此问题,请在包含该文件的目录中运行以下命令来安装所有必需的依赖项package-lock.json:
npm install
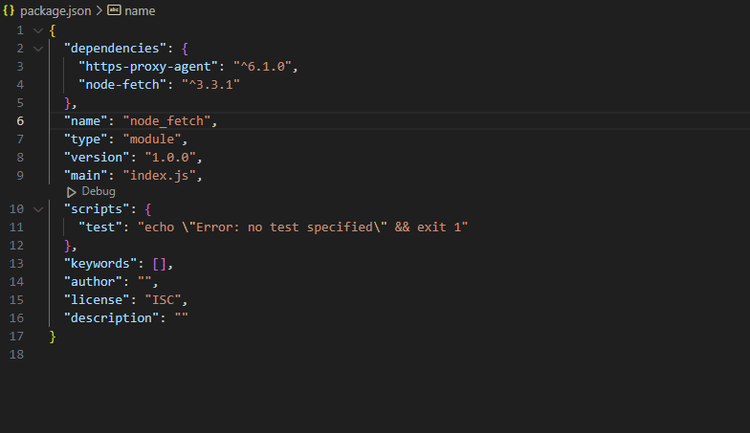
如果仍然出现错误,请注意当前的 Node-Fetch 版本 (v3.x) 是仅限 ESM 的模块。因此,在您的package.json文件中,设置"type" = "module"为能够加载 ES 模块。您的package.json文件应如下所示:
如果无法切换到ESM,请使用以下命令降级到Node-Fetch v2,它兼容普通JS:
npm install node-fetch@2
除了一些语法更改之外,版本 2 和 3 是相同的,因此您无需担心功能减少。
您可以在我们的NodeJS 网页抓取指南中了解更多信息。
如何通过 Node-Fetch 使用代理
如前所述,Node-Fetch 不支持代理。因此,要使用它,您必须使用HTTPS-proxy-agent.
首先使用以下命令安装所需的包 HTTPS-proxy-agent:
npm install https-proxy-agent
然后,打开一个新的项目文件并导入依赖项Node-Fetch和HTTPS-proxy-agent,并打开一个async函数。
import fetch from 'node-fetch';
import { HttpsProxyAgent } from 'https-proxy-agent';

(async () => {


})();
通过指定代理详细信息来定义代理配置。您可以使用Free-Proxy-List中的免费代理。
const proxyHost = '200.105.215.22';
const proxyPort = 33630;
HTTPS 代理适用于 HTTP 和 HTTPS 网站,而 HTTP 代理不适用于 HTTPS 网站。
接下来,构建代理 URL 并定义您的目标网站。在此示例中,我们正在抓取ident.me,这是一个提供发出请求的设备的 IP 地址的端点。所以,我们的代码如下所示:
const proxyUrl = `http://${proxyHost}:${proxyPort}`;
const targetUrl = 'https://ident.me/ip';
HttpsProxyAgent使用以代理 URL 作为参数的新实例创建代理。
const proxyAgent = new HttpsProxyAgent(proxyUrl);
最后,fetch使用定义的代理作为agent选项向目标 URL 发出请求。
const response = await fetch(targetUrl, { agent: proxyAgent });
将它们放在一起,您的代码应如下所示:
import fetch from 'node-fetch';
import { HttpsProxyAgent } from 'https-proxy-agent';

(async () => {
  // Proxy configuration
  const proxyHost = '200.105.215.22';
  const proxyPort = 33630;

  // Target website URL
  const targetUrl = 'https://ident.me/ip';

  // Proxy URL
  const proxyUrl = `http://${proxyHost}:${proxyPort}`;

  // Create a new Proxy Agent
  const proxyAgent = new HttpsProxyAgent(proxyUrl);

  // Fetch the target website using the proxy agent
  const response = await fetch(targetUrl, { agent: proxyAgent });

})();
让我们验证一下它是否有效。
//...
const html = await response.text();
console.log(html);


//.. 200.105.215.22 ..//
上面的结果是我们代理的IP地址而不是我们的原始IP。太好了,现在您知道如何设置 Node-Fetch 代理了。
使用带有 Node-Fetch 的旋转代理
许多网站实施基于 IP 的阻止或速率限制来打击机器人活动,例如从单个 IP 地址发送过多请求。根据您的使用案例,您可能需要的不仅仅是设置节点获取代理来避免被阻止。
通过轮换代理,每个请求都将显示为来自不同的 IP 地址,从而使网站更难以检测到您。让我们看看如何旋转 Node-Fetch 代理。
使用免费解决方案轮换 IP
使用免费解决方案轮换代理涉及使用多个代理池来随机处理每个请求。免费解决方案通常会提供一个列表,您可以下载到 CSV 文件中。但是,最好手动选择工作代理服务器到 CSV 文件或硬编码为静态数组。
让我们轮换一些代理。
首先,导入必要的依赖项并定义 Node-Fetch 代理列表数组。
import fetch from 'node-fetch';
import { HttpsProxyAgent } from 'https-proxy-agent';

const proxyList = [
  { host: '103.69.108.78', port: 8191 },
  { host: '61.29.96.146', port: 80 },
  { host: '154.204.58.155', port: 8090 },
];
与之前一样,上面的列表是从 Free-Proxy-List 获取的。
定义一个函数,将代理列表数组和目标 URL 作为参数。循环for函数将构造一个代理 URL,创建一个代理,并通过数组中的每个代理发出请求。它还应该打印目标 URL 的 HTML 内容。
async function RotateProxy(proxyList, targetUrl) {
  for (const proxy of proxyList) {
    try {
      const proxyUrl = `http://${proxy.host}:${proxy.port}`;
      const proxyAgent = new HttpsProxyAgent(proxyUrl);

      const response = await fetch(targetUrl, { agent: proxyAgent });
      const html = await response.text();

      console.log(html);
    } catch (error) {
      console.error(error);
    }
  }
}
最后,定义您的目标 URL 并调用该函数。
const targetUrl = 'https://ident.me/ip';
await RotateProxy(proxyList, targetUrl);
您的完整代码应如下所示:
import fetch from 'node-fetch';
import { HttpsProxyAgent } from 'https-proxy-agent';

const proxyList = [
  { host: '103.69.108.78', port: 8191 },
  { host: '61.29.96.146', port: 80 },
  { host: '154.204.58.155', port: 8090 },
];

async function RotateProxy(proxyList, targetUrl) {
  for (const proxy of proxyList) {
    try {
      //construct proxy URL
      const proxyUrl = `http://${proxy.host}:${proxy.port}`;
      //create proxy agent
      const proxyAgent = new HttpsProxyAgent(proxyUrl);

      //make request using random proxy from array
      const response = await fetch(targetUrl, { agent: proxyAgent });
      const html = await response.text();

      console.log(html);
    } catch (error) {
      console.error(error);
    }
  }
}

const targetUrl = 'https://ident.me/ip';
await RotateProxy(proxyList, targetUrl);
您应该得到与以下结果类似的结果,该结果表明每个请求都是使用数组中的不同代理发出的。
103.69.108.78
61.29.96.146
154.204.58.155'
恭喜,您已经使用 Node-fetch 创建了第一个代理旋转器!
然而,免费代理并不可靠,找到一个有效的列表可能具有挑战性。另外,即使您找到了,网站也可以轻松检测并阻止它们。例如,我们将用Amazon 产品页面替换示例 URL (ident.me) ,并记录每个请求的状态代码:
import fetch from 'node-fetch';
import { HttpsProxyAgent } from 'https-proxy-agent';

const proxyList = [
  { host: '103.69.108.78', port: 8191 },
  { host: '61.29.96.146', port: 80 },
  { host: '154.204.58.155', port: 8090 },
];

async function RotateProxy(proxyList, targetUrl) {
  for (const proxy of proxyList) {
    try {
      //construct proxy URL
      const proxyUrl = `http://${proxy.host}:${proxy.port}`;
      //create proxy agent
      const proxyAgent = new HttpsProxyAgent(proxyUrl);

      //make request using random proxy from array
      const response = await fetch(targetUrl, { agent: proxyAgent });
      const html = await response.text();

      //request status code
      const statusCode = response.status;

      console.log('Status Code:', statusCode);
      console.log(html);
    } catch (error) {
      console.error(error);
    }
  }
}

const targetUrl = 'https://www.amazon.com/Bose-QuietComfort-45-Bluetooth-Canceling-Headphones/dp/B098FKXT8L?th=1';
await RotateProxy(proxyList, targetUrl);
这是我们得到的结果:
Status Code: 403
//..
<HTML><HEAD><TITLE>Endian Firewall - Access denied</TITLE>
Status Code: 403
//...
<HTML><HEAD><TITLE>Endian Firewall - Access denied</TITLE>
Status Code: 403
//...
<HTML><HEAD><TITLE>Endian Firewall - Access denied</TITLE>
状态代码403意味着我们被拒绝访问,证明轮换免费代理不适用于实际用例。更好的解决方案是使用高级代理。查看我们的最佳代理服务列表,找到一些流行的选项。
同时,让我们看看如何避免被高级代理阻止。
高级代理以避免被阻止
高级代理过去很昂贵,尤其是对于大型项目。然而,像 ZenRows 这样的解决方案的出现改变了格局,因为它提供了经济实惠的高级代理计划,确保您只需为成功的请求付费。
ZenRows 的主要优势是其开箱即用的工具可以绕过反机器人措施。使用antibot=yes和 等参数js_render=yes,您可以渲染 JavaScript 内容并模仿人类行为,所有这些都只需几行代码。
要将 ZenRows 与 Node-Fetch 结合使用,首先,注册以获取免费的 API 密钥。您可以在“请求生成器”页面的顶部找到它。


现在,剩下的就是通过 API 向您的目标 URL 发出请求。ZenRows 将在幕后负责轮换高级代理以提供您所需的数据。
例如,我们将使用拒绝我们的免费代理访问的同一亚马逊产品页面作为目标 URL。
首先设置您的 API 密钥和目标 URL,然后使用它们构建您的 API URL。
import fetch from 'node-fetch';

const Api_key = 'Your API Key';
const targetUrl = 'https://www.amazon.com/Bose-QuietComfort-45-Bluetooth-Canceling-Headphones/dp/B098FKXT8L?th=1';

const apiUrl = `https://api.zenrows.com/v1/?apikey=${Api_key}&url=${encodeURIComponent(targetUrl)}`;
定义必要的参数。您可以激活高级代理,此外我们建议使用高级反机器人绕过和 JavaScript 渲染功能。
"premium_proxy":"true""antibot":"true""js_render":"true"
const params = {"js_render":"true","antibot":"true","premium_proxy":"true"}
然后fetch向 API URL 发出请求,并将参数作为请求选项传递。最后,记录 HTML 内容和状态代码。
(async () => {
  const response = await fetch(apiUrl, {
    headers: {
      'Content-Type': 'application/json',
     },
    params: params,
    });

  const html = await response.text();
  const statusCode = response.status;

  console.log('Status Code:', statusCode);
  console.log(html);
})();
您的完整代码应如下所示:
import fetch from 'node-fetch';

const Api_key = 'Your API Key';
const targetUrl = 'https://www.amazon.com/Bose-QuietComfort-45-Bluetooth-Canceling-Headphones/dp/B098FKXT8L?th=1';

const apiUrl = `https://api.zenrows.com/v1/?apikey=${Api_key}&url=${encodeURIComponent(targetUrl)}`;

const params = {"js_render":"true","antibot":"true","premium_proxy":"true"}

(async () => {
  const response = await fetch(apiUrl, {
    headers: {
      'Content-Type': 'application/json',
     },
    params: params,
    });

  const html = await response.text();
  const statusCode = response.status;

  console.log('Status Code:', statusCode);
  console.log(html);
})();
你会得到以下结果:
Status Code: 200
//...
{
  "answers": "280 answered questions",
  "availability": "In Stock                                                                               In Stock",
  "avg_rating": "4.6 out of 5 stars",
  "category": "Electronics › Headphones, Earbuds & Accessories › Headphones & Earbuds › Over-Ear Headphones",
  "description": "",
  "discount": "-15%-20%",
  "out_of_stock": false,
  "price": "$279.00",
  "price_without_discount": "$329.00",
  "review_count": "",
  "ships_from": "",
  "sold_by": "",
  "title": "Bose QuietComfort 45 Bluetooth Wireless Noise Cancelling Headphones - Triple Black",
  "features": [
    {
      "Product Dimensions": "3 x 7.24 x 6 inches"
    },
结论
在 2023 年,将代理与 NodeJS 库(如 Node-Fetch)一起使用对于数据提取来说将具有无价的价值。我们探索了不同的选项,并了解了免费代理即使在轮换时也会失败的情况。


