
如何在Ubuntu或CentOS/RHEL中安装Nginx?
在UNIX平台上安装Nginx的逐步指南。
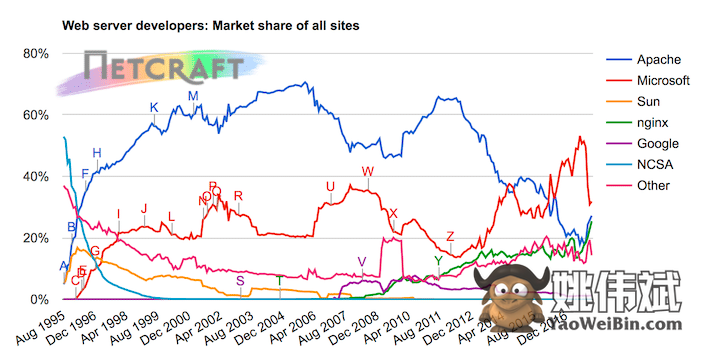
Nginx于2004年发布,自那时以来迅速增长。它在Web服务器中占据了超过30% market share。
让我们来看看各种UNIX发行版的安装过程。
Ubuntu
- 确保您已作为
root登录 - 执行以下命令
apt-get install nginx它将需要几秒钟来安装。
RHEL/CentOS
像往常一样,以root身份登录,并使用以下yum命令
yum install nginx如果使用RHEL 8,则还可以使用dnf命令。
dnf install nginx它将安装包括依赖项。以下是来自CentOS的快照。
已安装:
  nginx.x86_64 0:1.10.2-1.el6
已安装的依赖关系:
  GeoIP.x86_64 0:1.6.5-1.el6                                          GeoIP-GeoLite-data.noarch 0:2018.01-1.el6
  GeoIP-GeoLite-data-extra.noarch 0:2018.01-1.el6                     fontconfig.x86_64 0:2.8.0-5.el6
  freetype.x86_64 0:2.3.11-17.el6                                     gd.x86_64 0:2.0.35-11.el6
  geoipupdate.x86_64 0:2.2.1-2.el6                                    libXpm.x86_64 0:3.5.10-2.el6
  libxslt.x86_64 0:1.1.26-2.el6_3.1                                   nginx-all-modules.noarch 0:1.10.2-1.el6
  nginx-filesystem.noarch 0:1.10.2-1.el6                              nginx-mod-http-geoip.x86_64 0:1.10.2-1.el6
  nginx-mod-http-image-filter.x86_64 0:1.10.2-1.el6                   nginx-mod-http-perl.x86_64 0:1.10.2-1.el6
  nginx-mod-http-xslt-filter.x86_64 0:1.10.2-1.el6                    nginx-mod-mail.x86_64 0:1.10.2-1.el6
  nginx-mod-stream.x86_64 0:1.10.2-1.el6
使用源代码安装
如果您的服务器没有Internet连接,或者正在使用DMZ服务器,则可以从源代码编译安装。
以下演示来自CentOS/RHEL。
- 下载最新版本的Nginx source code并传输到服务器。
nginx-1.12.2.tar.gz- 提取下载的文件
gunzip –c nginx-1.12.2.tar.gz | tar xvf –- 提取后,您应该看到以下文件和文件夹
[root@instance-4 nginx-1.12.2]# ls -ltr
-rw-r--r--. 1 chandan scorpio_ckumar     49 Oct 17 13:16 README
-rw-r--r--. 1 chandan scorpio_ckumar   1397 Oct 17 13:16 LICENSE
-rwxr-xr-x. 1 chandan scorpio_ckumar   2481 Oct 17 13:16 configure
-rw-r--r--. 1 chandan scorpio_ckumar 423948 Oct 17 13:16 CHANGES.ru
-rw-r--r--. 1 chandan scorpio_ckumar 278202 Oct 17 13:16 CHANGES
drwxr-xr-x. 9 chandan scorpio_ckumar     91 Feb  3 03:11 src
drwxr-xr-x. 2 chandan scorpio_ckumar     21 Feb  3 03:11 man
drwxr-xr-x. 2 chandan scorpio_ckumar     40 Feb  3 03:11 html
drwxr-xr-x. 4 chandan scorpio_ckumar     72 Feb  3 03:11 contrib
drwxr-xr-x. 2 chandan scorpio_ckumar    168 Feb  3 03:11 conf
drwxr-xr-x. 6 chandan scorpio_ckumar   4096 Feb  3 03:11 auto
[root@instance-4 nginx-1.12.2]#
现在,我们准备配置和安装它。
您可以使用--prefix=path参数来控制安装位置。
让我们在/opt/nginx下安装并使用SSL模块。
./configure --prefix=/opt/nginx --with-http_ssl_module
make
make install
注意:如果您正在使用未安装编译器的全新服务器上进行操作,则需要安装以下内容。
yum install gcc pcre-devel openssl-devel完成后,您应该看到nginx已安装在/opt/nginx下,具有以下文件夹。
[root@instance-4 nginx]# ls -ltr
drwxr-xr-x. 2 root root   19 Feb  3 03:19 sbin
drwxr-xr-x. 2 root root 4096 Feb  3 03:19 conf
drwxr-xr-x. 2 root root    6 Feb  3 03:19 logs
drwxr-xr-x. 2 root root   40 Feb  3 03:19 html
[root@instance-4 nginx]#恭喜你,您刚刚安装了Nginx!
停止和启动过程
如果您使用源代码进行编译,则启动
- 进入sbin文件夹并执行nginx
./nginx停止
./nginx –s stop如果使用软件仓库安装,则
service nginx start
service nginx stop
下一步是什么?
如果这是用于生产环境,请进行必要的hardening and security configuration,如果是为了学习而进行探索,请查看online course。